Automotive
Automotive Batteries Hazard Classification: Complete Safety Guide for Retailers and Consumers
Automotive relays serve as electrical switches that control high current circuits use low current signals. These compact devices protect your vehicle’s electrical system while enable remote control of various components like headlights, cool fans, fuel pumps, and starter motors.
A typical automotive relay contain an electromagnet coil and a set of contacts. When current flow through the coil, it creates a magnetic field that pull the contacts unitedly, complete the circuit. This mechanism allow a small control current to switch lots larger loads safely.
Several relay types exist in automotive applications, each design for specific purposes. The almost common include:
Spot (single pole single throw )relays Feature four terminals and provide simple on / off switching. These relays work wellspring for basic applications like horn circuits or auxiliary lighting.
Spot (single pole double throw )relays Contain five terminals and offer both commonly open and commonly close contacts. This configuration enable switch between two different circuits or provide backup functionality.
DDT ((ouble pole double throw ))elays Include six or more terminals and can control multiple circuits simultaneously. These relays suit complex applications require coordinated switching operations.
Proper wiring require specific tools and materials to ensure safe, reliable connections. Gather these items before begin any relay installation:
Wire strippers and crimping tools enable clean, secure connections. Digital multimeters help verify voltage, continuity, and current flow. Electrical tape and heat shrink tubing provide insulation and protection.
Use automotive grade wire appropriate for your application’s current requirements. Typically, 14 16 AWG wire handle most relay control circuits, while 10 12 AWG wire suit high current load circuits. Proper fuse holders and fuses protect against overcurrent conditions.
Relay sockets simplify installation and replacement while provide secure connections. Choose sockets that match your relay’s pin configuration and mount requirements.
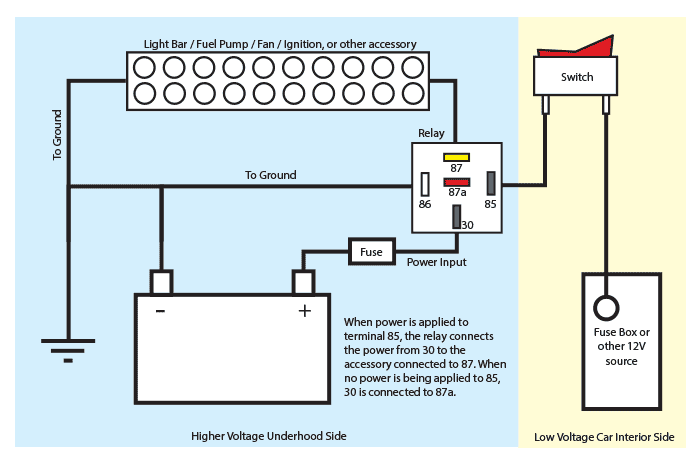
Every automotive relay include a pin diagram show terminal numbers and their functions. Understand these diagrams prevent wire errors and ensure proper operation.
Standard four pin relays typically use terminals 30, 85, 86, and 87. Terminal 30 connect to the power source (ordinarily battery positive ) Terminal 87 connect to the load ( (e device being control ).)erminals 85 and 86 connect to the coil, with one go to the control switch and the other to ground.
Five pin relays add terminal 87a, which provide a commonly close contact. This terminal connects to the load when the relay is notenergizede, switch to terminal 87 wheactivatedte.
Start by identify the relay’s purpose and location within your vehicle’s electrical system. Consult wiring diagrams specific to your vehicle’s make and model to understand exist connections and avoid conflicts.
Disconnect the battery’s negative terminal before begin any electrical work. This prevents accidental shorts and protect both you and the vehicle’s electrical components.
Mount the relay socket in an accessible location, sooner near the fuse box or other electrical components. Ensure adequate clearance for the relay and wiring connections.
Connect terminal 30 to a fused power source appropriate for your load’s current requirements. Use a fuse rate slenderly higher than the load’s normal operating current but lower than the wire’s capacity.
Wire terminal 87 to the positive terminal of your load device. For devices require a ground connection, run a separate wire from the load’s negative terminal to a good chassis ground point.
Connect terminal 85 to your control switch’s output. This could be a manual switch, another relay contact, or an electronic control module output.
Wire terminal 86 to ground, either direct to the chassis or through your control switch, depend on your switch configuration.
Some applications require more complex relay arrangements to achieve desire functionality. Multiple relays can work unitedly to create sophisticated control systems.
Relay latch circuits Maintain their state after the control signal disappear. These circuits use additional relays or electronic components to provide memory functionality.

Time delay circuits Incorporate capacitors or electronic modules to delay relay activation or deactivation. These configurations suit applications like courtesy lighting or cool fan override systems.
Interlock circuits Prevent conflict operations by use relay contacts to disable other relays. This arrangement ensure safe operation in systems where simultaneous activation could cause damage.
Electrical work carry inherent risks that proper precautions can minimize. Invariably disconnect the battery before work on any electrical system to prevent shorts and spark.
Use decent rate components for your application’s voltage and current requirements. Undersized wires or contacts can overheat, cause fires or system failures.
Protect all circuits with appropriate fuses or circuit breakers. Place fuse amp close to the power source as possible to maximize protection.
Secure all wiring to prevent chafing against sharp edges or move parts. Use proper routing techniques and protective materials in high wear areas.
Verify all connections are clean and tight before energize the circuit. Loose connections create resistance, heat, and potential failure points.
Proper testing ensure your relay installation functions right and safely. Begin with basic continuity checks before apply power to the circuit.
Use a multimeter to verify continuity through the relay coil between terminals 85 and 86. A typical automotive relay coil shows 50 200 ohms resistance.
Check for continuity between terminals 30 and 87 with the relay energize. No continuity should exist when the relay is DE energized (unless use terminal 87a on a five pin relay )
Measure voltage at each terminal with the circuit energize. Terminal 30 should show battery voltage, terminal 87 should match terminal 30 when the relay is activated, and the coil terminals should show appropriate control voltages.
Common problems include blow fuses, corrode connections, fail relay coils, and wear contacts. Systematic testing help isolate these issues rapidly.
Proper wire sizing ensure safe, efficient operation while prevent voltage drops that could affect performance. Calculate the total current draw of all devices control by the relay.
Add a safety margin of 25 50 % to your calculated current requirements when select wire sizes and fuse ratings. This margin account for startup surges and age components.
Consider voltage drop over long wire runs, specially in 12 volt systems where small voltage losses importantly impact performance. Use larger wire sizes or higher relay mount positions to minimize these effects.
High current applications may require multiple relays in parallel to distribute the load safely. This approach besides provide redundancy in critical systems.
Automotive relays enable numerous modifications and repairs that improve vehicle functionality and reliability. Understand typical applications helps identify opportunities for relay use.
Headlight relay Reduce the current flow through headlight switches, extend switch life and improve light output. Wire the relay to bypass the original switch for high beam and low beam circuits.
Cool fan relays Allow temperature sensors or engine control modules to operate radiator fans without high current switching. This arrangement improve fan response and reduce electrical stress on control circuits.
Fuel pump relays Provide safety features by shut off fuel flow when the engine stops. These relays typically receive control signals from ignition systems or oil pressure switches.
Starter relays Reduce the current load on ignition switches while provide positive starter engagement. Heavy-duty starter relays handle the high currents require by modern starter motors.
Regular maintenance extend relay life and prevent unexpected failures. Inspect relay connections sporadically for corrosion, looseness, or damage.
Clean relay sockets and terminals with electrical contact cleaner to remove oxidation and contamination. Apply dielectric grease to connections in harsh environments to prevent future corrosion.
Replace relays show signs of contact welding, coil failure, or erratic operation. Keep spare relays for critical systems to minimize downtime.
Document your relay installations with clear diagrams and component specifications. This documentation aids future troubleshooting and modifications.
Modern vehicles progressively use solid state relays and electronic control modules alternatively of traditional electromechanical relays. While these devices offer improved reliability and functionality, they require different troubleshooting approaches and can not be easy substitute with conventional relays.
Understand automotive relay wiring open numerous possibilities for vehicle improvement and repair. Whether add auxiliary lighting, upgrade cool systems, or troubleshoot electrical problems, proper relay installation techniques ensure safe, reliable operation. Take time to plan your installations cautiously, use quality components, and follow proper safety procedures for the best results.
MORE FROM promospotlight.com